Development and validation
This page explains how developers change the project's data or implementation, then generate and validate the results. It covers changes to data, JSON Schemas, code, and documentation. If this is your first time working on the project, start with the development requirements and basic change workflow. Use the command reference and later sections as needed for your task. If you only need to use the distributed data, see Using the distribution data.
-
Validate changes
Edit the source, update generated files, validate the repository, and build the documentation in order.
-
Preview documentation
Preview both editions together or enable live reload for the edition you are editing.
-
Compare product information
Keep an evidence source open while checking recorded data and repository validation results.
Development requirements
Clone the repository and install Python 3.14 or later and Hatch.
Run the commands on this page from the repository root.
The first hatch run command creates the required Hatch environment automatically.
Basic change workflow
Edit the applicable source files. See Edit files directly to identify the JSON files for a change.
Do not edit generated files directly
The three distributions under dist/ and PRODUCTS.md are generated from canonical records and other sources.
Edit the corresponding source files, then update the generated files with hatch run generate.
After making changes, run the following commands in order, from formatting to the documentation build.
hatch run format-json
hatch run generate
git diff -- dist PRODUCTS.md
hatch run check
hatch run docs:build
format-jsonformats the source JSON managed by the repository.generatebuilds the three distributions and product list.git diffconfirms that the generated files contain only the intended changes.checkvalidates the code, source JSON, licenses, tests, and repository-wide consistency.docs:buildbuilds the Japanese and English documentation.
Generation validates all inputs first and writes the three distributions and product list to temporary files before replacing their existing copies.
If a normal error or interruption occurs, generation restores every file that it already replaced.
If the operating system or process terminates before restoration can run, rerun hatch run generate to bring the generated files back into sync.
If a command fails
hatch run check runs several checks in sequence and stops at the first failure.
Checks listed after that failure have not run.
Fix the reported problem, then rerun the complete check command.
| Stopped command | Check first |
|---|---|
format-json or generate |
The source JSON, JSON Schema, or configuration named in the error. Do not edit generated files directly. |
check |
The first reported failure. If you use an individual command for diagnosis, rerun the complete check after the fix. |
docs:build |
Changed Markdown, links, and Zensical configuration. Check both the Japanese and English editions. |
After making all fixes, repeat the five commands in the basic change workflow from the beginning.
Command reference
Run hatch run check for a normal change.
To rerun only a failed check during diagnosis, use the corresponding individual command.
| Command | Purpose |
|---|---|
hatch run format-json |
Format source JSON under config/, data/, research/, schemas/, and tools/ |
hatch run check-json-format |
Check source JSON formatting without changing files |
hatch run generate |
Generate Lens Full, Lens Light, Mount adapter Full, and PRODUCTS.md |
hatch run validate |
Validate the JSON Schemas themselves, file placement, IDs, registry references, cross-file relationships, and other repository-wide rules |
hatch run lint |
Check Python lint and formatting |
hatch run typecheck |
Run mypy type checking on Python code |
hatch run test |
Run the pytest test suite |
hatch run check |
Run JSON formatting, license, Python, test, and repository validation checks |
hatch run review |
Start the local server used by Z Product Compare |
hatch run clean |
Remove generated files, build output, and caches |
hatch run docs:serve |
Build both editions and start a local server |
hatch run docs:serve-ja |
Start a live-reload server for the Japanese edition |
hatch run docs:serve-en |
Start a live-reload server for the English edition |
hatch run docs:build |
Build both editions for publication |
The repository JSON loader rejects duplicate object keys and the non-finite values NaN, Infinity, and -Infinity.
This check applies to research results, configuration, and JSON Schemas as well as canonical records.
Preview documentation locally
To preview the Japanese and English editions together, run:
This command builds both editions, placing English at / and Japanese at /ja/.
It then starts a local server for the build output.
You can also test the language switcher in the upper-right corner.
The local server starts at http://127.0.0.1:8766/.
For live reload while editing, start the Zensical development server for the target language.
Both development servers also start at http://127.0.0.1:8766/.
Build the publication version with:
docs:build uses the same settings as the publication workflow, treats warnings as errors, builds both editions, and writes the result to site/.
Change documentation
Update paired documents in the same pull request.
| Files | Primary edition and update order |
|---|---|
docs/ja/ and docs/en/ |
Edit Japanese first, then update the English file at the same relative path |
README.md and README.ja.md; CONTRIBUTING.md and CONTRIBUTING.ja.md |
Edit English first, then update Japanese |
A person must confirm that the explanations, procedures, code examples, and links match in both languages.
docs:build can detect structural and link problems, but it does not confirm that the two editions have the same meaning.
In bilingual notices such as LICENSING.md and directory LICENSE files, put each English heading and paragraph before its Japanese counterpart.
Schemas, JSON keys, and data narratives are English-first.
Compare evidence sources and data
Start the local server for Z Product Compare with hatch run review.
The repository includes an extension for Chrome and Edge.
It displays recorded data in a side panel while you keep an evidence source open in the browser.
The panel lets you switch between research results and canonical records and also shows repository validation results.
It supports the datasets for lenses and related optical products and for mount adapters.
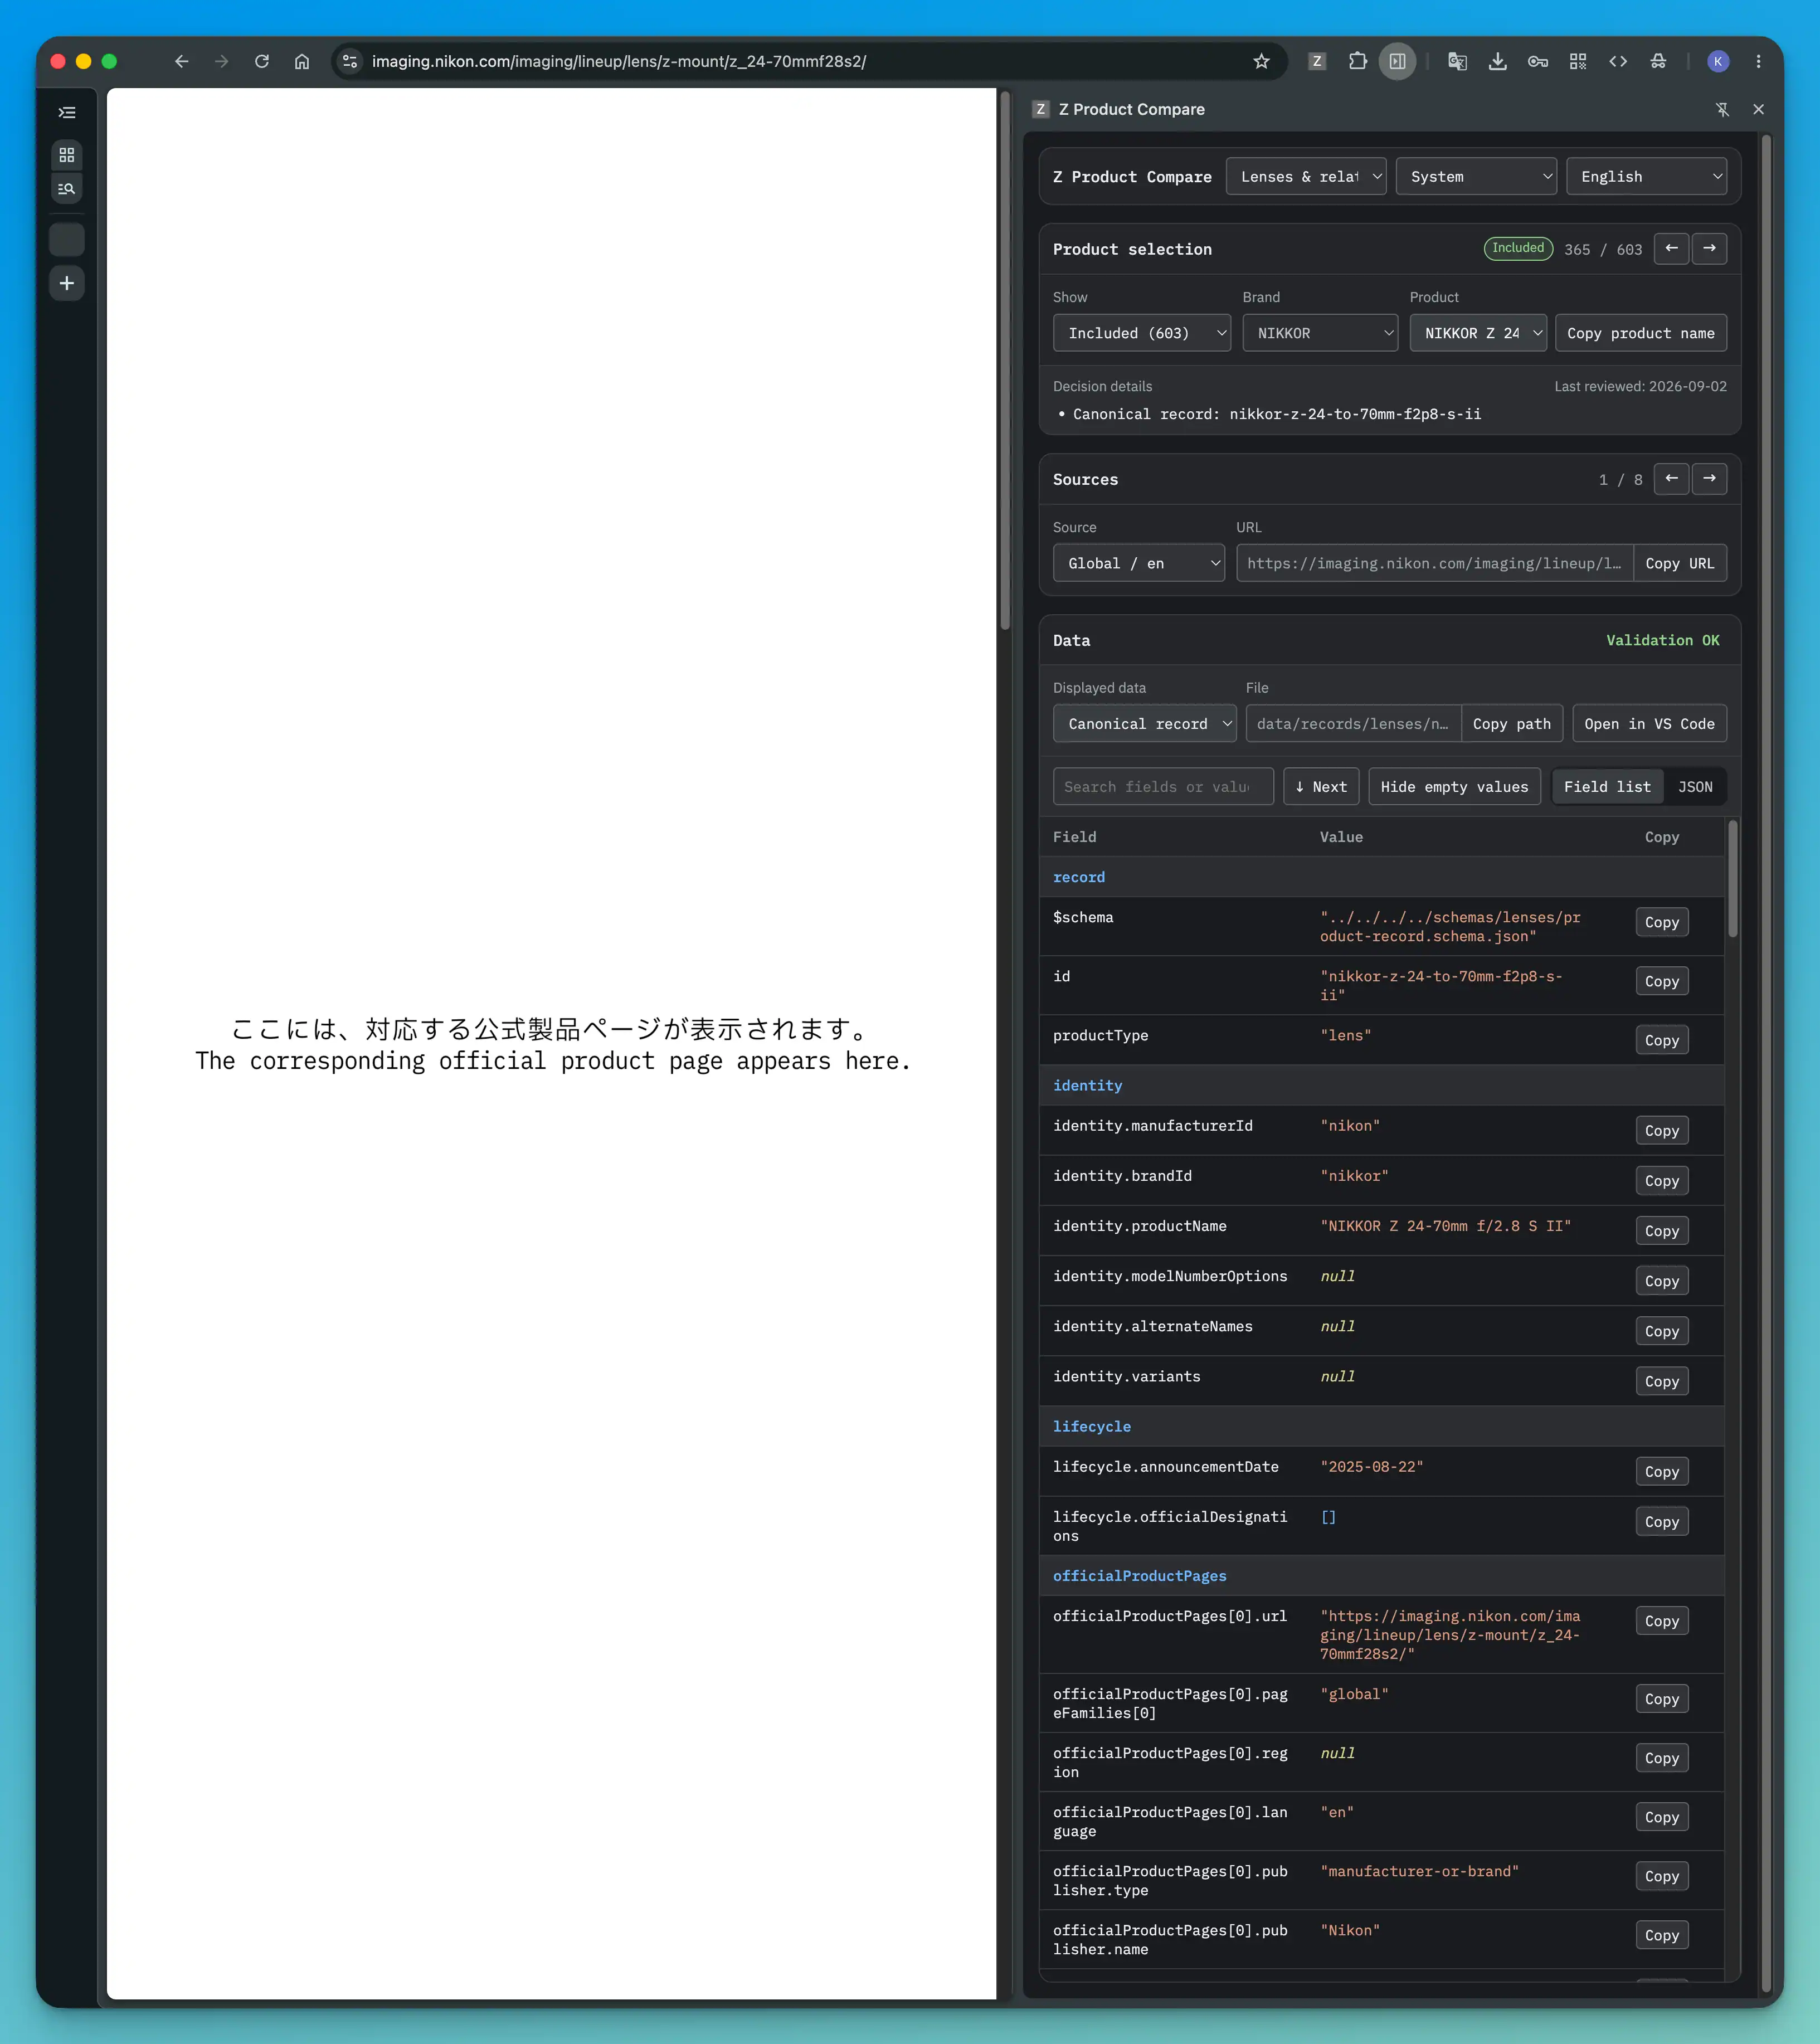
Example Z Product Compare screen, with the corresponding official product page shown on the left during actual use.
Start the local server
Run this command from the repository root:
The local server starts on 127.0.0.1:8765 and reads repository data.
It does not change data or open a browser automatically.
Keep the terminal running while you work.
The displayed content is a snapshot from server startup.
If you change repository files after starting the server, stop it, rerun hatch run review, and reconnect from the side panel.
Add the extension to Chrome or Edge
Install the extension once in each browser where you use it.
- Open
chrome://extensionsin Chrome oredge://extensionsin Edge. - Enable developer mode.
- Select Load unpacked and choose
tools/z-product-compare-extension. - Open a normal web page, then select
Z Product Comparefrom the extensions menu or toolbar.
If the side panel cannot connect to the local server, it shows the startup command and a reconnect button.
Select a product and evidence source
At the top of the panel, choose the lens and related optical products dataset or the mount adapter dataset. Choose Included, No canonical record, Needs review, Excluded, or All for the displayed scope. Then select a brand and product to see the inclusion decision, decision reason or unresolved questions, and last review date.
Selecting a product or source opens an available evidence source in the current tab.
A research result without sources shows 0 / 0 and does not navigate the current tab.
Use the arrow buttons in the product selector or the left and right arrow keys to move between products in the selected scope.
Use the arrow buttons in the source selector to move between sources recorded for the same product.
Display recorded data
For an included product, you can switch between its canonical record and research result. For a candidate without a canonical record, the panel shows its research result. You can view data as a field list or JSON. You can also show empty values and search within the data. The panel displays the current repository validation results.
Open data in VS Code
Select Open in VS Code to open the displayed canonical record or research result in VS Code and move to the line containing the product name.
This action uses the VS Code code command.
On macOS, if code is unavailable, run Shell Command: Install 'code' command in PATH once from the VS Code Command Palette.
Display and keyboard controls
Choose System, Light, or Dark for the theme. System follows the operating system and browser settings. The initial display language is English, and you can switch it to Japanese. The browser saves your theme and language choices.
Press T to switch between the field list and JSON, and press N to show or hide empty values.
In data search, press Enter to move to the next result.
Open without the extension
To open the standalone screen in a browser, run:
In the standalone screen, copy an evidence-source URL and open it in another tab.
You can change the server port with a command such as hatch run review --port 9000.
The extension connects to the default port 8765.
If you use another port, use the standalone screen instead of the extension.
Rebuild generated files and environments
To remove and rebuild generated files and documentation output, run these commands in order:
clean removes dist/, PRODUCTS.md, site/, build/, and tool caches.
It preserves research results, canonical records, registries, JSON Schemas, and configuration.
Immediately after clean, Git shows dist/ and PRODUCTS.md as deleted.
generate restores them from the same inputs.
To recreate the Hatch environments and their dependencies as well, run:
hatch env prune removes this project's Hatch environments.
Run clean before env prune.
If you run hatch env prune first, the following hatch run clean recreates the default environment.
The next hatch run command recreates each required environment automatically.
Generation and release constraints
Generate the same distribution data from the same inputs. If a normal error or interruption occurs during an update, restore files already replaced, as described in the basic change workflow.
The product records in each Full dataset must match their canonical records, with only the per-record $schema removed.
Do not add an adapter Light distribution without separate approval.
Build each Lens Light product record by retaining only the fields defined by the current schema from the corresponding Full record.
Preserve product order, id, productType, common block names, and the product-type block name; retained values and types must match.
Apply the Lens Full and Lens Light rules when retaining arrays and values.
Do not change which fields and array entries Light retains unless a separately approved website migration requires it.
Generate referenceData according to the shared registry rules, using identical contents in Lens Full and Lens Light.
Do not publish the two source registries as standalone release assets.
Calculate contentHash according to the distribution hash definition.
Numbers included in the calculation must meet RFC 8785's I-JSON requirements; integers are limited to the inclusive range -9007199254740991 through 9007199254740991.
Use JSON Schema Draft 2020-12.
Define lens and adapter data structures separately; put only public definitions that are deliberately shared by both under schemas/shared/.
Registry-only schemas belong under schemas/internal/ and have no public $id.
Both datasets use the same schemaVersion in config/versions.json, with public URL paths under lenses/, adapters/, or shared/.
Before creating a release tag, make both documentation editions and every public versioned schema available at their respective URLs.
Release verification checks schema availability and exact contents while excluding repository-only schemas under schemas/internal/.
Use the same YYYY.MM.DD value without a v prefix for dataVersion, the Git tag, and the release date.
Change a JSON Schema
When changing a JSON Schema file, choose a new schemaVersion according to the schema compatibility rules.
Update config/versions.json and every version-bearing $id, fixed value, and reference to the same version, along with both editions of the JSON Schema reference and any required migration guidance.
Then complete the basic change workflow.
Never overwrite or delete a published versioned JSON Schema.
Use a new schemaVersion when a change is required.
Related pages
- Reporting and editing product information: files to change and the pull request process
- Research results: how to record inclusion decisions, evidence sources, and unresolved questions
- Data model: relationships among research results, canonical records, and distributions
- JSON Schema reference: types, required properties, allowed values, and conditional constraints